How to Install Remote-Control Car Window Dimming Film: A Comprehensive Technical Guide
The integration of smart technology into automotive accessories has made remote-control car window dimming film a sought-after upgrade for privacy, security, and comfort. Unlike traditional static tint, this electrochromic or suspended particle device (SPD) film allows for instantaneous opacity adjustment at the touch of a button. However, its installation is a precise technical procedure that demands careful preparation and execution. This article provides a detailed, step-by-step guide for the technically inclined DIY enthusiast or aspiring installer, covering principles, tools, installation methodology, and calibration.

Understanding the Technology
Before beginning installation, it is crucial to understand the system's components. Remote-control car window dimming film typically falls into two categories:
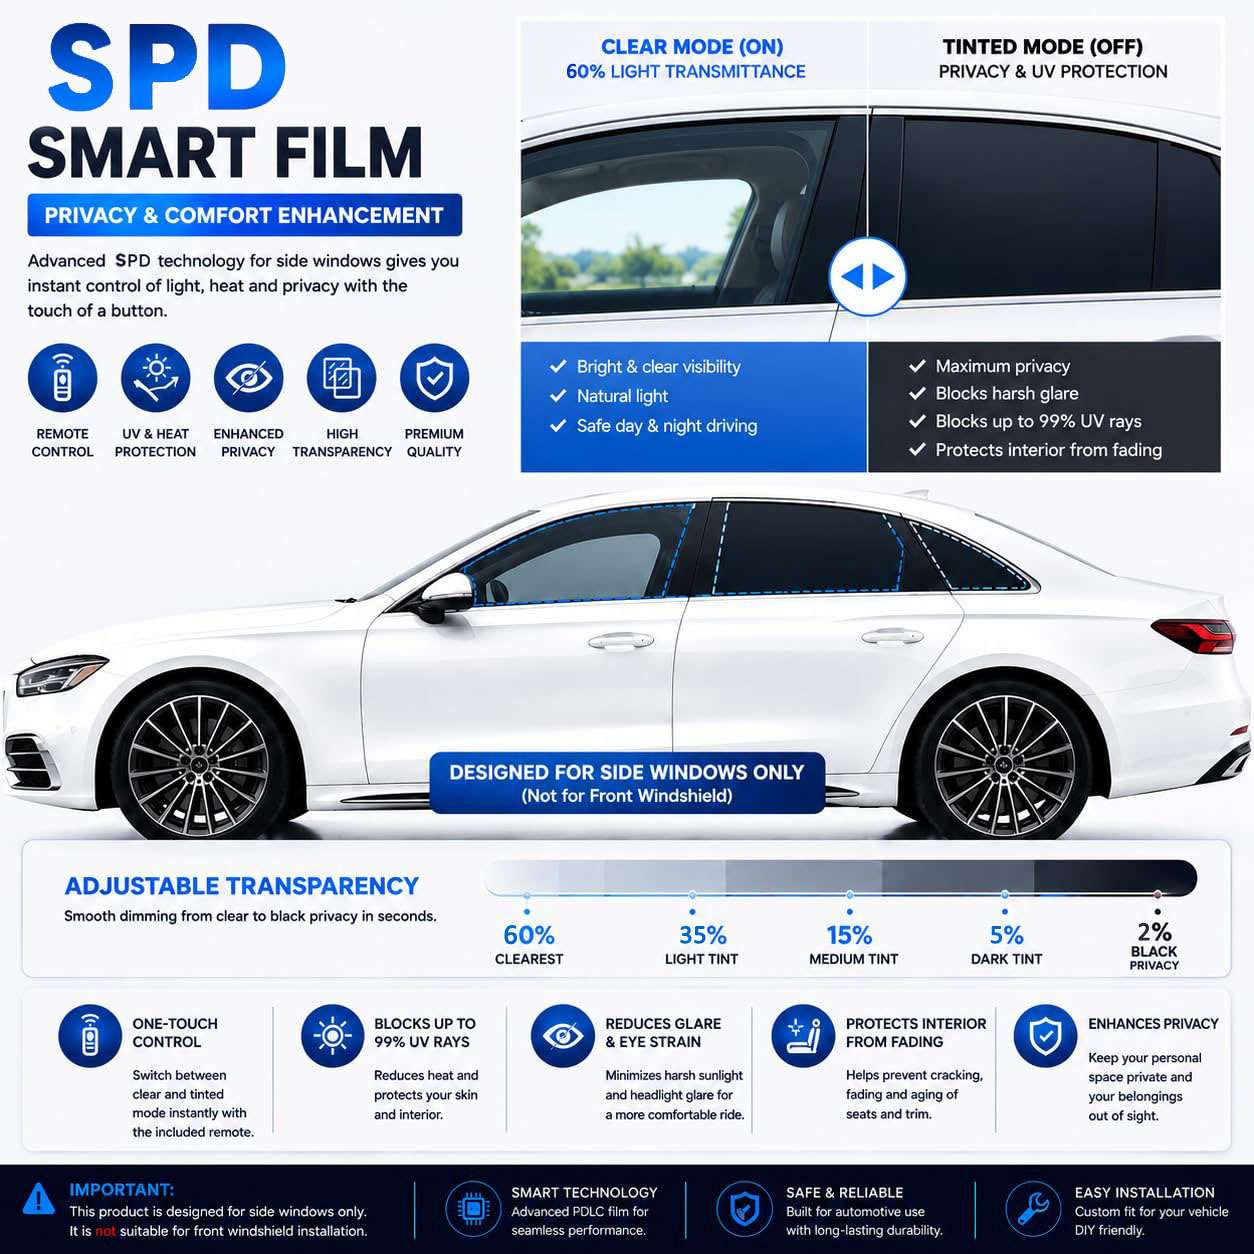
Electrochromic Film: Contains materials that change light transmission properties when a small electrical voltage is applied, moving from clear to dark.
SPD (Suspended Particle Device) Film: Contains microscopic particles suspended in a fluid. When voltage is applied, these particles align to allow light to pass; when voltage is removed, they randomize, blocking light.
The system comprises:
The Smart Film: The adhesive-backed laminate containing the active layer.
The Control System: A central control box (ECU) that regulates voltage.
The Power Supply: Connects to the vehicle’s 12V electrical system.
The Interface: Remote control(s), smartphone app, or hardwired switches.
Busbars & Connectors: Thin, conductive edges on the film where electrodes are attached to deliver voltage across the pane.
Improper installation can lead to film failure, electrical shorts, uneven dimming, or damage to vehicle electronics. This guide assumes intermediate DIY competency.
Pre-Installation: Tools, Preparation, and Vehicle Assessment
2.1 Essential Tools & Materials:
Clean Room Environment: A dust-free, indoor, well-lit space is non-negotiable. A garage is ideal.
Cleaning & Prep Solutions: High-quality automotive glass cleaner, isopropyl alcohol (99%), distilled water, lint-free microfiber cloths (many), a new razor blade scraper.
Installation Solution: A slip solution of 2-3 drops of baby shampoo per liter of distilled water in a spray bottle.
Squeegees: A hard felt-edged squeegee for initial water expulsion and a soft-configured squeegee for final detailing.
Heat Gun or Professional Torch: For shrinking and conforming the film to curved windows.
Precision Cutting Tools: Sharp Olfa knife or similar, with plenty of fresh blades.
Electrical Tools: Wire strippers/crimpers, multimeter, soldering iron & heat-shrink tubing, electrical tape, fuse taps or soldering equipment for power connection.
Protective Materials: Painters tape, plastic sheeting to protect interior panels and dash.
2.2 Vehicle Assessment & Planning:
Electrical Access: Identify a suitable 12V ignition-switched (ACC) power source and a constant ground point. Consult your vehicle’s wiring diagram. The control box typically draws 1-5A; ensure your tap point can handle this load. A fuse tap into an appropriate circuit in the fuse box is often the cleanest method.
Routing Paths: Plan how to route the film’s electrode cables and control wires from each window to the central control unit location (often under the dash or in the trunk). You may need to remove door panels, A-pillar trims, and kick panels.
Film Orientation: Identify the busbar edges on each film panel. The manufacturer will designate positive (+) and negative (-) terminals. Plan the cable routing from these edges discreetly towards the door’s wiring boot.

Step-by-Step Installation Procedure
Phase 1: Window & Film Preparation
Disconnect Vehicle Battery: Always the first step when working with vehicle electronics.
Remove Door Panels/Trims: Carefully remove interior panels to access the window seal area and the path for routing cables. Follow a service manual for your specific vehicle to avoid breaking clips.
Create a Template & Cut Film: For complex curves, use a pre-cut kit or create a precise paper template. When cutting the film, leave a 1-2mm gap from the edge of the glass seal (the "dot matrix" or black frit) to prevent peeling and ensure a proper seal.
Meticulous Glass Cleaning: This is 90% of a successful install.
Scrape the entire glass surface with a new razor blade to remove any stubborn contamination.
Clean with glass cleaner, then follow with an isopropyl alcohol wipe.
Final clean with distilled water. The glass must be perfectly smooth and contaminant-free. Any particle left will be permanentlyvisible.
Phase 2: Film Application (The "Wet Install")
Peel and Spray: Peel the liner from the film. Liberally spray the exposed adhesive side of the film with your slip solution. Simultaneously, spray the prepared interior glass surface.
Apply Film: Carefully position the film onto the glass. The slip solution allows you to float and adjust the film for perfect alignment. Ensure the busbar edge is positioned where you planned the cable exit (usually at the bottom of the window for doors).
Initial Squeegee: Using your hard squeegee, start from the center and work outwards in a vertical pattern to expel the bulk of the slip solution. Apply firm, even pressure.
Edge Sealing & Heating: For curved windows, use the heat gun on a low-medium setting to gently heat the film while using the soft squeegee to conform it smoothly to the curvature. Avoid overheating. Once positioned, firmly squeegee all edges to ensure a tight seal. Use a lint-free cloth to wick moisture from the perimeter.
Phase 3: Electrical Integration - The Critical Phase
Connect Electrodes: Attach the manufacturer-provided electrode connectors to the exposed busbars at the film’s edge. This often involves clipping or clamping a connector. Seal this connection as per instructions (usually with provided insulating putty or tape) to prevent moisture ingress and corrosion.
Route Cables: Neatly run the thin electrode cables from each window. For doors, this usually involves drilling a small, carefully placed hole in the door metal (protect with a grommet) and running the cable through the factory wiring boot into the cabin. Use wire loom or tape for protection.
Install Control Unit: Mount the central ECU in a dry, secure location (e.g., under dash, in glovebox, trunk). Connect all window electrode cables to their designated ports on the ECU.
Power Connection:
Constant 12V (BAT+): Connect to a constant power source (e.g., battery positive via a fuse) for memory functions.
Switched 12V (ACC): Connect via a fuse tap to a circuit that powers on with the ignition. This is the primary operational power.
Ground (GND): Connect to a clean, unpainted metal point on the vehicle’s chassis.
Switches/Receiver: Connect any physical switches or the receiver for the remote control to the designated ports on the ECU.
Test Before Reassembly: Reconnect the vehicle battery. Before reassembling door panels, perform a full system test. Use the remote to cycle each window from clear to dark and back. Check for even dimming, speed of transition, and listen for any unusual sounds from the ECU.
Phase 4: Finalization & Calibration
Cure Time: The film requires time for the adhesive to fully cure and residual moisture to evaporate ("dry cure"). Do not operate windows or clean the film for the period specified by the manufacturer (typically 3-7 days). Parking in warm, sunny weather accelerates curing.
Reassembly: Once tested, carefully reinstall all interior trim panels, ensuring cables are not pinched.
System Calibration: Some advanced systems may require calibration via a sequence of button presses to set the "clear" and "dark" state limits. Refer to the manufacturer’s manual.
Troubleshooting Common Technical Issues
Uneven Dimming ("Patches" or "Streaks"): Caused by contamination during installation, improper squeegeeing, or damage to the film's conductive layer. Prevention via a clean install is key. It is often not fixable post-application.
Film Does Not Dim: Check all electrical connections. Use a multimeter to confirm 12V at the ECU inputs and the correct output voltage (usually ~50-110V AC for SPD, lower DC for electrochromic) at the window terminals. Verify busbar connections.
Only One Window Inoperative: Isolate the issue to that window’s film (test busbar conductivity), its electrode cables, or its specific port on the ECU.
Film Dims Slowly or Poorly in Cold Weather: This is a characteristic of the technology, particularly SPD film. Performance is temperature-dependent.
Interference with Radio/GPS: Poorly shielded control boxes or cables can cause EMI. Relocate the ECU away from antenna modules and ensure cables are twisted or shielded.
Maintenance & Longevity Best Practices
Cleaning: After the cure period, clean only with a soft microfiber cloth and a mild, ammonia-free glass cleaner. Ammonia will destroy the film’s active layer.
Window Operation: Avoid using the automatic "up" function until fully cured to prevent peeling. Be mindful of ice on the windows in winter.
Electrical Care: Ensure all connections remain dry and secure. If the vehicle battery is disconnected for long periods, the film may default to its opaque state until power is restored.

Conclusion
Installing remote-control car window dimming film is a rewarding project that blends the disciplines of detailing, electrical work, and precision craftsmanship. While demanding, a successful installation results in a transformative vehicle feature offering on-demand privacy, reduced heat load, and enhanced aesthetic appeal. The process underscores a fundamental principle of automotive modification: the quality of the outcome is directly proportional to the rigor of the preparation. By adhering to a clean environment, meticulous surface preparation, careful electrical integration, and patient curing, the installer can achieve a professional, reliable, and durable smart window system.
For more about how to install remote-control car window dimming film: a comprehensive technical guide, you can pay a visit to FengQun Pet Gear Supplier for more info.