Electric Privacy Tint for Car Windows: The Ultimate Cost & DIY Guide
Imagine driving down the highway and, with the touch of a button, your side and rear windows transform from perfectly clear to deeply shaded, shielding you from prying eyes, harsh glare, and the sun's intense heat. This isn't science fiction; it's the reality offered by electric privacy tint, an advanced automotive upgrade that merges cutting-edge technology with practical comfort and security. Moving beyond traditional static films, electrochromic or "smart" window tint offers dynamic control over light and privacy. This comprehensive guide will delve into the technology behind these innovative films, provide a detailed breakdown of costs, and walk you through the considerations and steps for a potential DIY installation.

Understanding the Technology - How Electric Privacy Tint Works
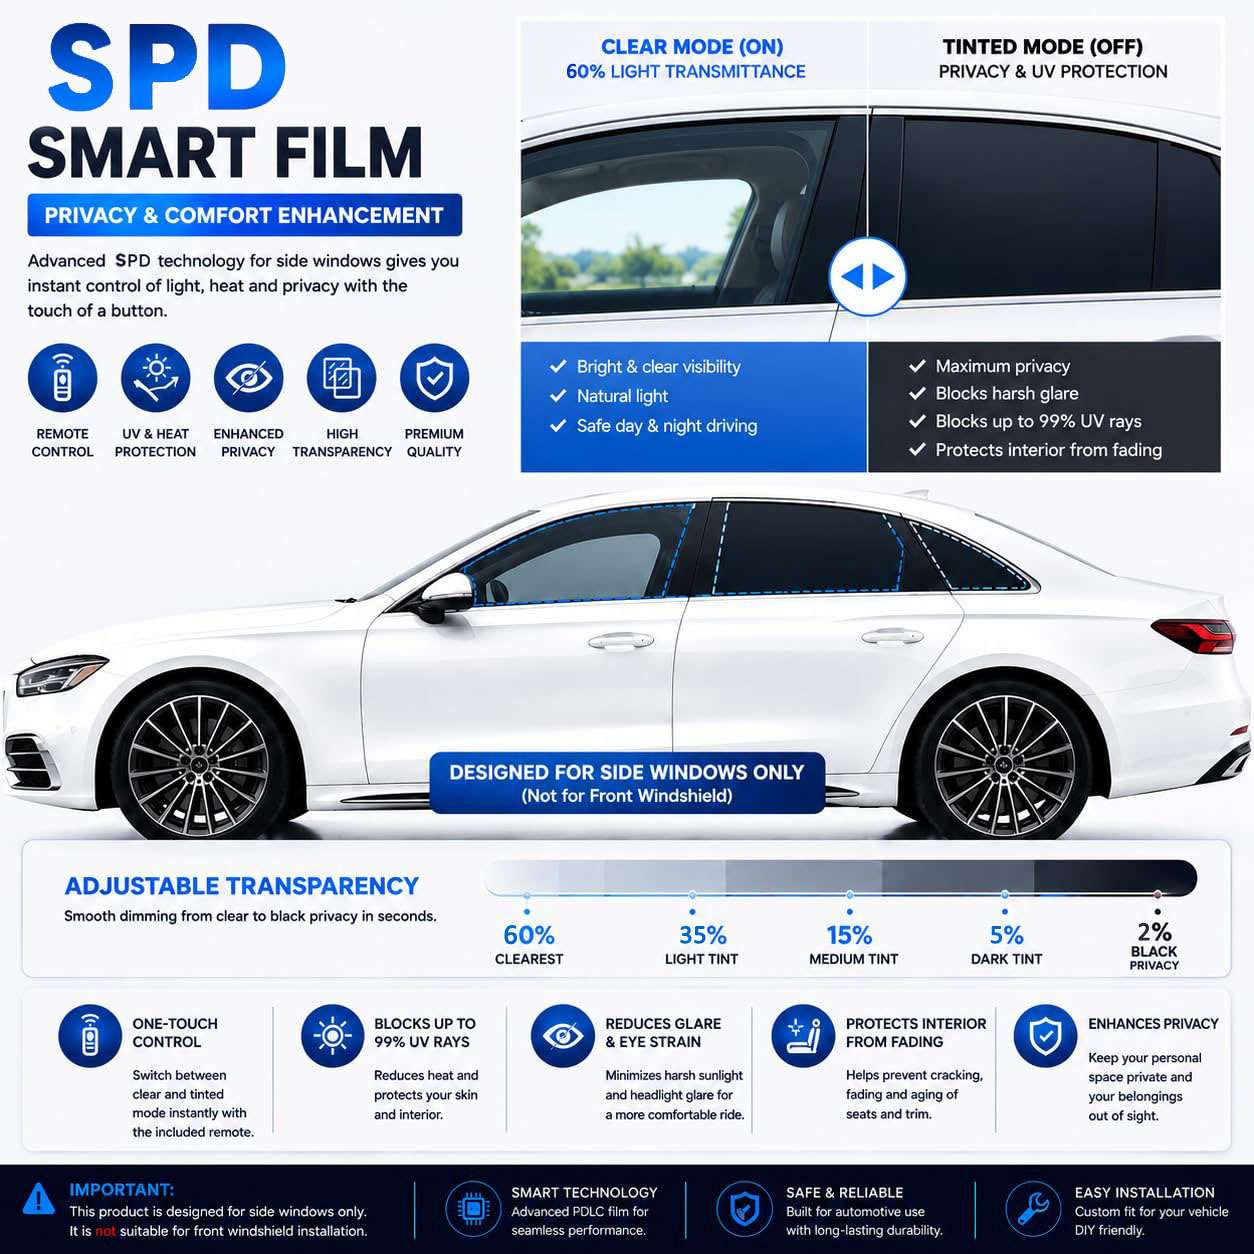
Before discussing cost or installation, it's crucial to understand what you're dealing with. Electric privacy tint is often referred to by several names: smart window tint, electrochromic film, switchable film, or PDLC (Polymer Dispersed Liquid Crystal) film. While there are subtle differences, the core principle remains the same: using electricity to alter the window's opacity.
The Core Mechanism: PDLC Technology
The most common type for automotive aftermarket applications is PDLC film. Here’s a simplified breakdown of how it works:
Film Structure: The film is a sandwich. Between two layers of conductive material (usually transparent indium tin oxide, or ITO) lies a layer of polymer containing microscopic liquid crystal droplets.
"Off" State (Translucent/White): When no power is applied, the liquid crystals are randomly oriented. They scatter light in all directions, giving the film a frosted, opaque, or milky-white appearance. This provides maximum privacy and diffuses light.
"On" State (Clear): When an electrical current (typically low-voltage AC, like 36V-110V AC) is applied, the liquid crystals align in an orderly fashion. This alignment allows light to pass through directly, making the film transparent andrestoring a clear view.
It's important to note that PDLC film is a privacy film, not a traditional dark tint. Its primary function is to switch between opaque and clear. In its clear state, it offers little to no sun heat rejection or UV protection on its own. Therefore, it is often combined with a traditional dyed, carbon, or ceramic tint layer for a complete solution: darkness for heat/glare control plus switching capability for privacy.
Key Components of a Complete System:
The Smart Film: The self-adhesive PDLC layer.
The Power Supply/Inverter: Converts your car's 12V DC power to the AC voltage required by the film. This is a critical component and must be correctly rated.
The Control System: This can range from a simple wired switch or remote control to integration with a smartphone app or even the car's infotainment system via a smart controller.
Wiring Harness: To connect the film's busbars (power collection edges) to the inverter and the inverter to the vehicle's electrical system.
Cost Breakdown - A Significant Investment
Electric window tint is a premium automotive modification. Costs can vary wildly based on quality, vehicle size, and who does the installation. Below is a detailed breakdown.
1. DIY Kit Costs:
If you're sourcing materials yourself for a DIY project, you'll need to account for all components.
Component | Price Range (Approx.) | Notes |
PDLC Smart Film (per sq. ft.) | $25 - $70+ | Price depends on quality, switching speed, clarity in "on" state, and opacity in "off" state. Higher-end films have less blue tint when clear and a whiter opaque state. |
Power Inverter/Controller | $80 - $300 | A good quality, reliable inverter is non-negotiable. App-controlled models are at the higher end. |
Wiring, Switches, Fuses | $20 - $50 | For basic electrical connections. |
Installation Tools & Squeegees | $50 - $150 | High-quality application tools, razor blades, spray bottles (for slip solution), and heat guns are essential for a good result. |
Traditional Tint Film (Optional) | $2 - $10 per sq. ft. | If adding a separate layer for heat rejection. Ceramic films are the best (and most expensive) for heat rejection without affecting signals. |
Total Estimated DIY Material Cost for a Standard Sedan (4 doors + rear windshield):
Low-End/Basic: $800 - $1,500
Mid-Range/Good Quality: $1,500 - $2,500
High-End/Best Quality with Ceramic Tint: $2,500 - $4,000+
2. Professional Installation Costs:
This is the most common route due to the complexity. Professionals provide the film, all components, labor, and most importantly, a warranty.
Average Total Cost: For a full car (side windows and rear windshield), professional installation typically ranges from $2,500 to $6,000+.
What You're Paying For:
Expertise: Experience in handling the delicate film, avoiding bubbles, and ensuring perfect alignment of electrical connections.
Warranty: Professional installers usually offer a 1-3 year warranty on the film and electrical components.
Clean Integration: They can often hide wiring more effectively and integrate switches or controls seamlessly into your interior.
Time: Saves you a full weekend or more of frustrating work.
Cost Factors:
Vehicle Size: A pickup truck with a large rear window will cost more than a coupe.
Film Quality: As with DIY, premium films command premium prices.
Number of Windows: Front windshield is rarely done due to legal and technical complexity (it requires a special laminate), but if done, it adds significantly to the cost.
Shop Location & Reputation: High-end shops in metropolitan areas charge more.

The DIY Guide - Is It Feasible?
Attempting a DIY installation of electric privacy tint is a high-difficulty project, suitable only for individuals who are exceptionally patient, detail-oriented, and have experience with both window film installation and basic automotive electrical work. Here is a step-by-step guide and critical considerations.
Pre-Installation: Planning & Preparation
Legality Check: This is paramount. Laws regarding window tint (including opaque/frosted windows) vary by state, province, and country. Most jurisdictions prohibit any non-transparent material on the front side windows and windshield. Using the tint in its opaque state while driving is almost certainly illegal. Its legal use is typically when the vehicle is parked (for privacy) or for rear passenger compartments. You are 100% responsible for knowing and complying with local laws.
Vehicle Selection & Window Assessment: Complex curved windows (like on many modern cars) are exponentially harder to tint than flat ones. Your first attempt should not be on a BMW with compound-curved rear glass.
Kit Selection: Purchase a complete kit from a reputable supplier. Ensure it includes the correct amount of film, an inverter rated for your film's voltage/amperage, and all necessary connectors.
Workspace: You need a perfectly clean, dust-free, and indoor environment. A garage is essential.
Mental Preparation: Accept that you may ruin a very expensive piece of film. Order extra if possible.
Installation Phase: A Step-by-Step Overview
Phase A: Electrical Setup & Testing (Do this FIRST)
Test the Film: Before applying anything to the window, connect a small piece of film to the inverter and power source. Verify it switches perfectly. This confirms all components work.
Plan the Wiring Route: Decide where the inverter will be mounted (e.g., under a seat, in the trunk) and how you will route wires from each window to it. You'll need to run wires through door boot connectors—a task that requires disassembling door panels.
Connect Busbars: Each film sheet has exposed busbars (usually copper strips). You must solder or use proprietary connectors to attach wires to these before applying the film to the glass. This step requires precision and care.
Phase B: Window Film Application (The High-Stress Part)
This process is similar to, but more critical than, applying traditional tint.
Clean the Glass Impeccably: Any speck of dust will be trapped forever. Use a brand-new razor blade and ammonia-free cleaner.
Create a "Slip Solution": A mix of distilled water and a few drops of baby shampoo.
Peel & Spray: Peel the liner off the adhesive side of the PDLC film, liberally spray the adhesive with slip solution, and spray the clean window.
Apply the Film: In the flooded environment, carefully position the film on the exterior of the window. Use a squeegee to roughly push out water and position it perfectly. This is the "outside method" used to cut the film to the exact shape of the window.
Precision Cutting: With a sharp blade, trim the film to the exact window edges.
Transfer & Final Application: Peel the film off the outside, spray the interior side of the glass, and apply the film inside the vehicle. Using your squeegee and heat gun,methodically work out all water and bubbles from the center outward. The use of a heat gun is crucial to shrink the film to complex curves.
Repeat: For each window.
Phase C: Final Electrical Integration & Sealing
Run Wires: Carefully run the wires from each window through the door channels and to the inverter location. Use grommets and loom to protect wires.
Connect to Power: Connect the inverter to a switched 12V power source (so it turns off with the car) via an appropriate fuse tap. Ground the inverter properly.
Install Control Switch: Mount your switch or controller in a desired location.
Seal Busbars: Once all connections are tested and working, you must use a waterproof silicone sealant or butyl tape to insulate and seal the exposed busbar connections on the film. Failure to do this will lead to corrosion and failure.
Post-Installation:
Curing: The film's adhesive will take several days to fully dry. Do not operate the switch during this time (usually 3-7 days) as moving the film can cause adhesive failure.
Final Test: After the cure time, test all windows thoroughly.
DIY vs. Professional: A Clear Comparison
Factor | DIY Installation | Professional Installation |
Cost | Lower upfront material cost. | Higher total cost, but includes labor and warranty. |
Time | Significant (20-40 hours for a first-timer). | Usually 1-2 days in the shop. |
Skill Required | Very High. Requires tinting skill, electrical knowledge, and car disassembly skill. | None required from the owner. |
Risk | Very High. Risk of ruining expensive film, damaging electrical components, or poor installation (bubbles, peeling). | Low. Reputable shops guarantee their work. |
Warranty | Typically only manufacturer defect warranty on components, no labor coverage. | Comprehensive warranty covering film, parts, and labor for 1-3 years. |
Result Quality | Highly variable. Likely to have minor imperfections or issues. | Should be flawless, with clean electrical integration. |
Convenience | Low. A stressful, time-consuming project. | High. Drop off and pick up a finished product. |
The Verdict: For 95% of car owners, professional installation is the strongly recommended path. The cost savings of DIY are often illusionary when you factor in the high risk of expensive mistakes, the lack of warranty, and the immense investment of time and stress.
Alternatives to Electric Privacy Tint
If the cost or complexity is prohibitive, consider these alternatives:
Traditional High-Quality Ceramic Tint: Excellent heat rejection and UV protection, with good privacy. No switching capability, but far more affordable ($300-$800 professionally installed).
Manual Window Shades: Pop-in static shades or pull-down curtains for rear passengers. Maximum privacy when parked, zero integration.
Perforated Decal Films: From the inside, these appear as a dark, slightly textured tint. From the outside, they are one-way mirror-like, offering daytime privacy. They do not switch and can slightly obscure the view from inside at night.

Conclusion
Electric privacy tint represents the zenith of automotive window technology, offering unparalleled control over your vehicle's environment. It is a statement of luxury, functionality, and technical interest. However, it comes with a substantial price tag and significant installation challenges.
For the enthusiast with deep pockets, a trusted professional installer is the key to a successful, worry-free upgrade. For the exceptionally skilled and patient DIYer, it remains a "Mount Everest" project—immensely rewarding if you reach the summit, but fraught with peril on the climb.
Carefully weigh the costs, the legal landscape, and your own technical capabilities. If you proceed, whether by writing a check or wielding a squeegee, you will be installing one of the most conversation-starting and satisfying high-tech features available for the modern car.
For more about the electric privacy tint for car windows: the ultimate cost & DIY guide, you can pay a visit to Hechen PDLC Smart Film Manufacturers for more info.