PDLC Film for Cars Buyer's Guide: How to Choose the Right One
TL;DR: Car owners select the best PDLC (polymer-dispersed liquid crystal) smart film for automotive windows. It covers the key technical parameters: switching speed, off‑state haze, UV/IR rejection, operating temperature range, power consumption, and lifespan. You will learn how to distinguish automotive‑grade film from generic architectural film, what to check before installation (curved glass compatibility, edge sealing, driver quality), and how to balance price against real‑world durability. No brand names or models are mentioned – only measurable specifications and practical testing methods. By the end, you will be able to make an informed decision based on your climate, vehicle type, and privacy needs.

1. Introduction: Why a buyer’s guide is necessary
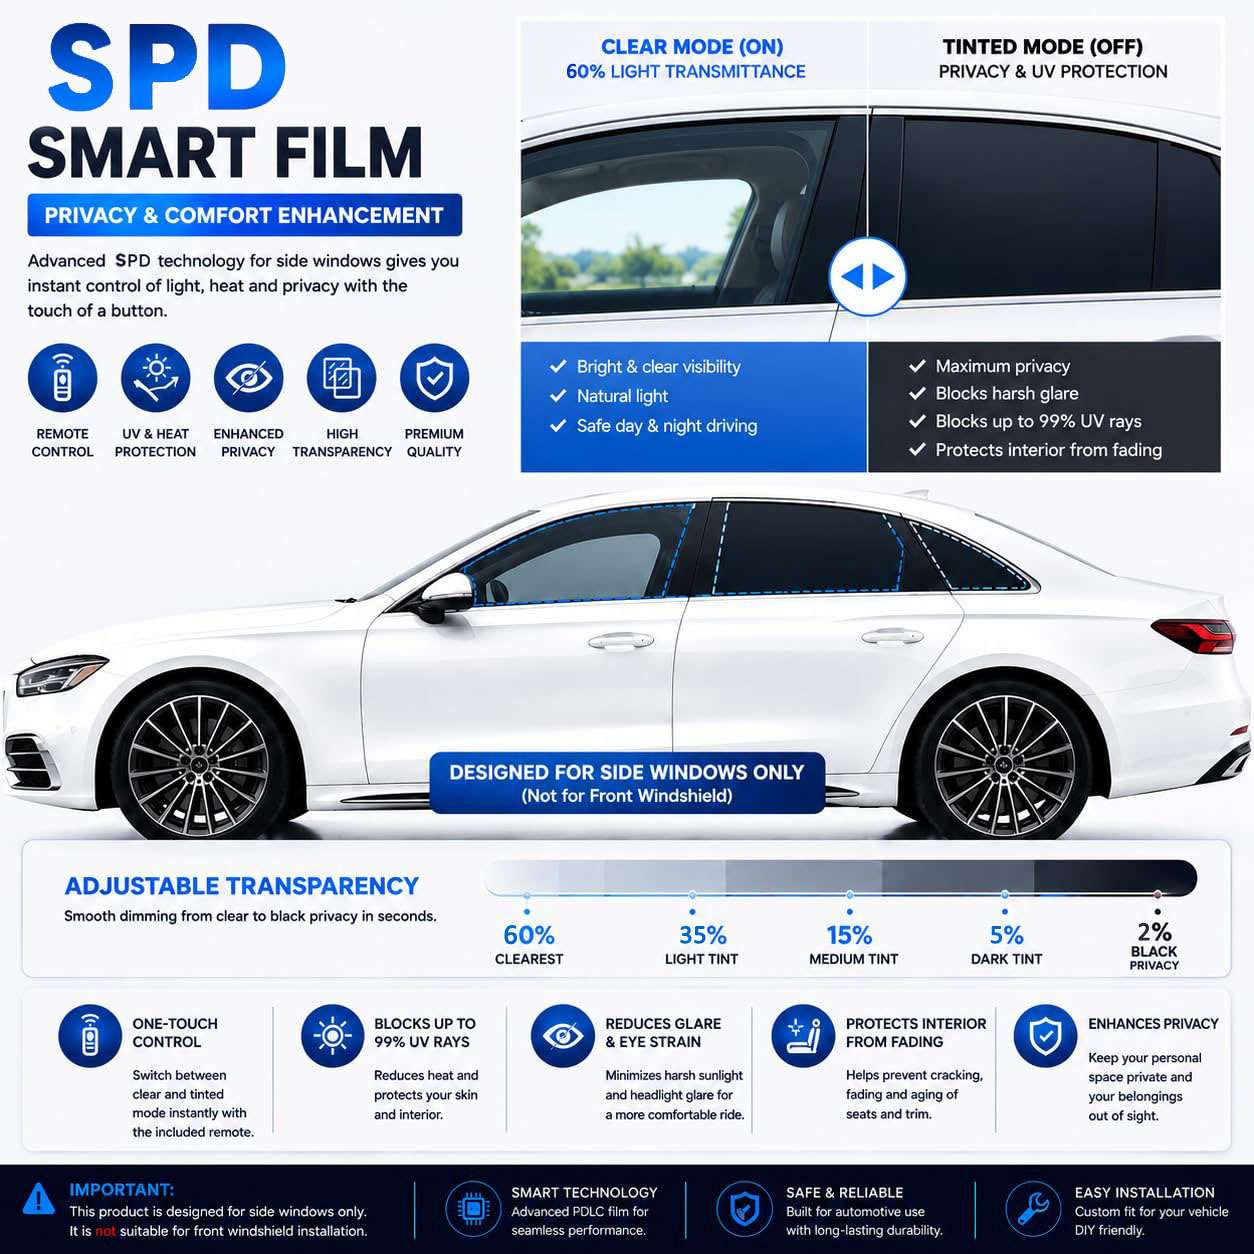
PDLC film for cars has moved from a novelty to a practical aftermarket upgrade. It allows instant switching between a translucent white/opaque state (privacy mode) and a transparent state (clear view) via a small electrical current. Unlike traditional window tints that are static, PDLC gives you on‑demand control.
However, not all PDLC films are suitable for automotive use. Many products sold online are actually designed for office partitions or building windows – they fail quickly under the extreme temperatures, vibrations, and UV exposure inside a car. This guide provides a technical framework to separate genuine automotive‑grade PDLC film from unsuitable alternatives. You will learn exactly what specifications to ask for, how to test the film before installation, and what trade‑offs to expect at different price points.
2. Understanding PDLC technology basics (for buyers)
Before comparing products, you need to understand how PDLC works and what parameters affect performance.
A PDLC film consists of liquid crystal microdroplets dispersed in a polymer matrix, sandwiched between two transparent conductive layers (usually ITO‑coated PET). When no voltage is applied, the liquid crystals are randomly oriented, scattering light and creating a milky white appearance. When an AC voltage (typically 12–60V, 50–1000Hz) is applied, the crystals align, allowing light to pass through.
For automotive use, the film must be laminated to the inner surface of existing glass (not replacing the glass). The electrical connection is made to the vehicle’s 12V system via a control unit.
Key performance parameters you will encounter:
Off‑state haze – the degree of opacity when power is off. Measured in percentage (e.g., 85% means 85% scattered light, 15% transmitted). Automotive grade: ≥80% for privacy.
On‑state transparency – clarity when powered. Look for ≤3% residual haze. Good film has ≥75% visible light transmission (VLT) in clear state.
Switching time – time from opaque to clear (typically 0.1–2 seconds). Faster is not always better; extremely fast switching can cause visible flicker.
Operating temperature range – critical for cars. Minimum: -30°C to +85°C. Some cheap films fail above 60°C.
Power consumption – usually 1–3 watts per square meter when transparent. Negligible for a car battery.
As a buyer, you should request these specifications in writing. If a seller cannot provide them, assume the film is not automotive‑grade.
3. Automotive‑grade vs. architectural PDLC: Critical differences
Many buyers unknowingly purchase PDLC film intended for office or home use. Here is a technical comparison:
| Feature | Architectural PDLC | Automotive PDLC |
|---|---|---|
| UV resistance | Limited (yellowing in 1–2 years) | High (UV‑stabilized, 5+ years) |
| Temperature range | 0°C to 50°C | -30°C to 85°C |
| Vibration tolerance | Low | High (tested to automotive vibration standards) |
| Edge sealing | Basic or none | Hermetic or double‑sealed to prevent moisture ingress |
| Adhesive type | Permanent for flat glass | High‑tack optically clear adhesive for curved glass |
| Curved glass compatibility | Poor (bubbles at edges) | Good (pre‑curved or flexible enough for gentle curves) |
Why this matters: Installing architectural PDLC in a car will likely lead to delamination within months, especially in hot climates. The film may become permanently opaque or develop “fried egg” patterns (uneven switching). Always verify that the film is explicitly marketed for automotive use – and look for test reports or certifications (e.g., ISO 20653 for dust/water resistance, SAE J575 for automotive environmental testing).
4. Key selection criteria: What to check before buying
4.1 Operating voltage and driver compatibility
Most cars provide a nominal 12V DC (actual 11.5–14.5V). PDLC film requires AC to prevent ion migration (which causes permanent haze). Therefore, a driver (inverter) is mandatory.
Good practice: The driver should output a pure sine wave or modified sine wave at 30–60V AC, 50–400Hz. Avoid drivers that output DC – they will destroy the film within weeks.
Power connection: Choose a driver that can be wired to a switched 12V source (e.g., window switch, cigarette lighter) so the film returns to opaque when the car is off (saving power and providing privacy when parked).
Remote vs. manual: Both work, but RF remotes can be lost. A discreet rocker switch integrated into the door panel is more reliable.
4.2 Optical performance numbers to demand
Ask for a data sheet. Minimum acceptable values:
Visible light transmission (clear state): ≥72% (higher is better, but >80% is rare for retrofit films)
Haze (clear state): ≤3% (above 5% gives a foggy appearance)
Off‑state opacity: ≥80% haze (some films claim 95%, but measure realistically)
UV rejection: ≥99% (UV damage to interior is a major concern)
IR rejection (heat): PDLC inherently blocks some IR, but not as much as ceramic tint. Typical IR rejection is 30–60%. If heat rejection is critical, combine PDLC with a clear ceramic film.
4.3 Physical durability
Scratch resistance: The outer surface should have a hard coating (≥2H pencil hardness). Soft films will scratch during cleaning.
Adhesive strength: Peel adhesion should be ≥20 N/25mm (high‑tack). Low‑tack adhesive may peel off on curved glass.
Edge sealant: Automotive PDLC must have a moisture‑barrier seal around all four edges. Without it, humidity enters and causes electrolysis – the film turns permanently cloudy.
4.4 Curved glass compatibility
Most car side windows are slightly curved (cylindrical or spherical). Flat PDLC film will not conform perfectly, leading to air gaps or bubbles.
Solution 1: Choose a film that is pre‑curved using a heat‑forming process. Some manufacturers offer “conformable” PDLC with a thinner substrate (0.2–0.3 mm PET) that can bend.
Solution 2: Use a wet installation method with a heat gun to gently shape the film. However, excessive heat can damage the liquid crystal layer. This is best left to professionals.
Check before buying: Ask whether the film has been tested on double‑curved glass (e.g., rear side windows of hatchbacks). Flat glass (some trucks) is easiest.
4.5 Lifespan and warranty
A good PDLC film for cars should last 5–8 years under normal use. Degradation appears as:
Increased haze in transparent mode (from 3% to 10%+)
Slower switching (from <1s to >5s)
Permanent white spots (failed droplets)
Yellowing of the PET substrate
Warranty terms: Look for at least 2 years against delamination, yellowing, and electrical failure. Some sellers offer 5‑year warranties – but read the fine print: does it cover automotive use, or only indoor use?
5. Installation considerations: DIY vs. professional
The film price (typically USD 200–400 for four side windows) often excludes installation. Here is what you need to know.
5.1 Professional installation – recommended
Cost: USD 100–250. A professional will:
Clean the glass to near‑sterile conditions (dust causes permanent bubbles)
Cut the film precisely to match the window shape (including curves)
Apply using a slip solution and a specialized squeegee
Route the wiring through the door panel without pinching
Seal edges with a UV‑cured or silicone edge sealant
Test the driver and ground connections
Pros: Reliability, warranty often requires professional install. Cons: Adds to total cost.
5.2 DIY installation – possible but risky
Cost: your time + basic tools (squeegee, razor knife, spray bottle, heat gun). Many kits include instructions. However, common DIY mistakes include:
Trapping dust or lint – visible as dark specks in transparent mode
Over‑squeegeeing – can damage the conductive layer
Poor edge sealing – moisture ingress after first car wash
Incorrect wiring – polarity errors or using DC instead of AC
Verdict: If you have installed window tint successfully before, you can attempt DIY. Otherwise, pay a professional. A failed DIY installation wastes the film cost.
6. Combining PDLC with other films (e.g., tint, anti‑shatter)
PDLC alone does not block as much infrared heat as a dedicated ceramic tint. It also does not provide significant shatter resistance (although the PET substrate adds some). Therefore, many buyers use a hybrid approach:
Option A: PDLC only – best for privacy and novelty, acceptable heat rejection.
Option B: PDLC + clear UV/IR blocking film – applied either over or under the PDLC. This gives the best of both worlds: switchable privacy plus thermal comfort. Ensure the combined thickness does not exceed the window’s tolerance (some power windows struggle with films over 0.5mm total).
Option C: PDLC on side windows, ceramic tint on rear and front – common and cost‑effective.
Note: Do not apply PDLC over an existing dark tint. The dark background will make the opaque state less effective (light cannot scatter back) and may cause overheating.
7. Common pitfalls and how to avoid them
Based on real user experiences, here are the most frequent complaints and solutions.
| Problem | Cause | Solution |
|---|---|---|
| Film stays permanently cloudy | Driver outputs DC, or moisture ingress | Replace driver; re‑seal edges |
| Bubbles under film after 1 month | Dust trapped or poor adhesive | Professional re‑install |
| Switching is slow or uneven | Low‑quality driver or film degradation | Check driver frequency (should be >50Hz) |
| Yellow tint after summer | UV degradation (architectural grade) | Buy automotive‑grade with UV stabilizers |
| Edges peeling off | Glass too curved or adhesive too weak | Use pre‑curved film or professional heat‑forming |
| Remote control interference | RF blocked by metalized glass | Use wired switch or change frequency |
Prevention: Before purchasing, ask the seller for a sample piece (e.g., 10cm x 10cm). Test it with a multimeter and a variable power supply. Leave it in a parked car for a week in summer. If it survives, buy the full set.
8. Cost vs. value: What price range is reasonable?
As discussed in the previous article, a genuine automotive PDLC film for four side windows typically costs USD 200–400. Within this range:
Lower end (USD 200–280): Basic driver, manual switch, slightly higher on‑state haze (3–5%), shorter warranty (1–2 years). Suitable for mild climates and occasional use.
Mid range (USD 280–350): Good driver (RF remote), ≤3% haze, edge sealed, 2–3 year warranty. Recommended for most buyers.
Upper end (USD 350–400+): Low‑haze (≤2%), pre‑curved for curved glass, premium driver with soft‑start, 5‑year warranty. Best for demanding applications (limousines, camper vans).
Avoid any film priced below USD 150 for four windows – it is almost certainly architectural grade or counterfeit. The cost of raw materials (ITO film, liquid crystals, driver) makes lower prices impossible for genuine automotive product.
9. Legal and safety considerations
Before buying, check your local vehicle regulations:
Front side windows: Many jurisdictions require a minimum visible light transmission (e.g., 70%). PDLC in clear state typically achieves 72–78%, which may be legal. However, in opaque state it would violate tint laws – but you can simply keep it clear while driving.
Windshield: PDLC is not recommended for windshields due to optical distortion risk. Most laws prohibit any film on the windshield except a top strip.
Rear windows: Usually no restriction, but some countries require dual side mirrors if rear window is opaque.
Safety note: PDLC film does not significantly reduce shard ejection during a crash, but it can hold broken glass together (similar to safety film). Ensure the film does not interfere with airbag deployment (e.g., on side curtains).
10. Final checklist before clicking “buy”
Use this technical checklist to evaluate any PDLC film for cars:
Is it explicitly rated for automotive use? (Look for temperature range -30°C to +85°C)
What is the on‑state haze? (Should be ≤3% for clear viewing)
Does it include an AC driver? (Never use DC directly)
Are edges sealed against moisture? (Visible as a thin clear or black border)
Is the adhesive suitable for curved glass? (Ask about pre‑curving or conformability)
What is the UV rejection? (≥99% to prevent yellowing)
Warranty length and coverage? (At least 2 years, including automotive conditions)
Have you factored in professional installation? (Add USD 100–250)
Will the total thickness (film + any other layers) fit your window channel? (Measure clearance)
Can you get a sample for testing? (Essential for peace of mind)
Conclusion: Choosing the right PDLC film is about matching specs to your needs
No single PDLC film is perfect for every car and every climate. A buyer who lives in a hot, humid region needs excellent edge sealing and UV resistance, while someone in a cold climate prioritizes low‑temperature switching performance. A sports car with sharply curved windows requires pre‑curved film, whereas a van with flat glass can use standard flexible film.
By focusing on measurable specifications – temperature range, haze values, UV rejection, driver type – you can avoid marketing hype and make an evidence‑based decision. The USD 200–400 price range offers reliable options, but only if you verify the technical details. When in doubt, pay slightly more for a film with clear documentation and a warranty that explicitly covers automotive use.

Key Takeaways
Automotive PDLC film differs fundamentally from architectural film – it must withstand -30°C to +85°C, vibration, and UV exposure. Never buy film without automotive‑grade specifications.
Critical specifications to check: On‑state haze ≤3%, off‑state haze ≥80%, UV rejection ≥99%, switching time ≤2 seconds, and an AC driver (never DC).
Curved glass compatibility is a major issue – flat film will bubble on curved windows. Look for pre‑curved or highly conformable (thin) film.
Edge sealing is non‑negotiable – without it, moisture enters and permanently ruins the film within months.
Professional installation is strongly recommended (adds USD 100–250). DIY is possible only if you have prior tinting experience and the right tools.
Price range USD 200–400 for four side windows is the genuine automotive‑grade bracket. Below USD 150 is likely counterfeit or architectural grade.
Combine PDLC with a clear ceramic film if you need high heat rejection – PDLC alone blocks only moderate IR.
Always test a sample before buying a full set. Leave it in a parked car for a week to check for yellowing, bubbles, or switching failure.
Check local laws – front side windows in clear state may be legal, but opaque state while driving could violate tint regulations.
Lifespan is 5–8 years for quality film, with degradation showing as increased haze, slower switching, or permanent white spots.
For more about PDLC Film for Cars Buyer's Guide: How to Choose the Right One. Everything you need to know, you can pay a visit to https://www.ppfforcar.com/product/PDLC-Smart-Film/ for more info.